For the challenges this month...
Here is a challenge from Litdev...
Graphical Challenge 2
Write a program with an arrow that rotates to always point towards the mouse.
I'm featuring a solution created by Zock77:
![]()
Have a great day!
- Ninja Ed
For the challenges this month...
Here is a challenge from Litdev...
Graphical Challenge 2
Write a program with an arrow that rotates to always point towards the mouse.
I'm featuring a solution created by Zock77:
![]()
Have a great day!
- Ninja Ed
As one of the many collaborations we're working on with the Kodu team, they featured me in their Community Spotlight.
Click here to read my interview with the Kodu team
Here are a few of the questions they asked me...
What sort of lessons can students learn in Small Basic?
 You learn the core concepts quickly and easily because you learn them in the simplest environment. BASIC was started in 1964 and stands for Beginner's All-purpose Symbolic Instruction Code. It was created to teach software development. So we've provided a version that's even more simplified and better suited to get you up and running, writing your own code, and understanding core programming concepts, even faster. These core concepts include Variables, Conditions & Branching, Loops, Graphics, Shapes, Subroutines, Arrays, and Events & Interactivity.
Follow one of our tutorials, and you'll likely pick up these concepts much more quickly on your own (and even faster with a mentor helping you) than you would in a classroom, where you might learn the concepts for the first time, in a more complicated language. You'll learn all the foundational building blocks of languages like Visual Basic, C++, C#, and many more.
In your opinion, what’s the coolest thing about Small Basic?
Small Basic was originally designed by Vijaye Raji, and its success is derived from three pillars of value.
First, it's Simple. Small Basic is imperative and doesn't use or expose beginners to concepts like scopes, types, object orientation, etc. The language consists of just 14 keywords. There isn't a type system. You can create string and numeric constants and assign them to variables. Operations performed on these variables will be interpreted according to the content. All variables are global and are always initialized. They can be used before they're assigned! You can create a sub-routine and assign it to an event. The libraries provide static "Objects" that group operations, properties and events. New libraries can be created using other .Net Languages and added to the Small Basic runtime. If you're new to programming, this doesn't sound very simple. A lot of these details are what helps make Small Basic easier to learn and you can read more in the Small Basic FAQ.
Second, it's Social. Share your programs with your friends; let them import your published programs and run them on their computer. You can even post your games on your blogs and websites for them to play your creations in the browser! Check out the Small Basic Program Gallery, listed by category for examples. After you work together in making your game, you can discuss it with the
community in the Small Basic MSDN Forum. And then we might feature it on the Small Basic MSDN Blog.
Third, it's Gradual. Small Basic is based on .NET and what you learn here could be easily applied to other .NET programming languages like Visual Basic. When you do “graduate” to Visual Basic, just click the Graduate button, and you can bring your existing programs with you into Visual Basic via the free Visual Studio Express download. Using this system, you can learn Visual Basic,
C++, and C#, without ever spending a dime.
Thanks to the Kodu team for the interview!
- Ninja Ed
As one of the many collaborations we're working on with the Kodu team, they featured me in their Community Spotlight.
Click here to read my interview with the Kodu team
I feature some of my answers here: What sort of lessons can students learn in Small Basic? (Kodu Community Spotlight: Part 1)
Here is part two, with some more of the questions they asked me...
We love success stories! Would you share with us your favorite success story surrounding Small Basic?
In my passion to see more girls educated in software engineering, here is one of my favorite stories... A key community member and Small Basic Forum Moderator, LitDev, has 2 daughters (in Scotland) who he taught Small Basic to, at age 8. He said, "They use [Small Basic] mainly to create little graphical programs, lots of bright colors. The first extension I wrote was for them that speaks text - [and they created their own programs that] mostly insult each other! Here are examples: GQL381 (look for the hidden message) and FVV083 (must run locally; uses LitDev extension) of the kind of thing they wrote."
So there you go. Small Basic is useful for insulting your siblings. Oh, and education! That too.
(Feel free to check out the Small Basic Student Testimonials for more great stories.)
| Phil Conrad (Small Basic Partner) on location, teaching Small Basic. | 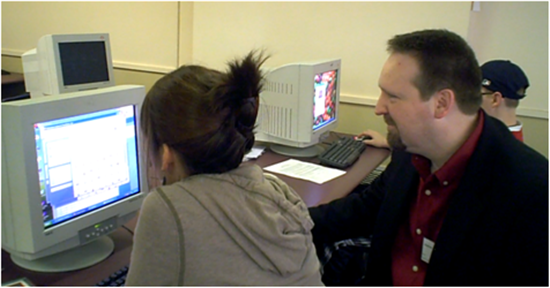 |
What sort of options are available for teachers who may want to give students the additional challenge Small Basic can offer?
Check out Get Started with Small Basic. We have the free Getting Started Guide and the Small Basic Curriculum (which includes written materials and professionally made PowerPoint decks for teaching in a classroom, and low-cost books and camps from our various partners). We hope to update that page with more curriculum strategies and options as we continue to pursue integrating Small Basic into education.
Also, see
In your opinion, what specific elements of Kodu help prepare students for Small Basic?
Kodu can help you get excited about what's ultimately possible in the world of development. You’ll also build a foundation of key programming concepts like conditions and variables. Small Basic provides the next logical step after you get a taste of what's ultimately possible.
Small Basic is unique because it introduces code as a first class concept, which is how you'll eventually have to approach computer science. Kodu is something you can always come back to in order to easily create fun worlds and 3D environments.
Do you have any general advice for someone who might want to transition from Kodu into Small Basic?
The biggest step is the first step. Try to devote a minute a day to checking out Small Basic. Install it and explore what's possible. Before long, you'll be in the software or game industry creating our next generations of technology.
Thanks to the Kodu team for the interview!
- Ninja Ed
Learn more about Small Basic and find detailed samples by reading sample chapters from one of three e-books that we are providing to you at no cost. If you like using the e-book format, we have links on each page to where you can purchase the complete e-book.
.png) | |
| |
|
We're starting with these three ebooks from Phil Conrad. Let me know if you've written a Small Basic book and would like it featured like this.
See the latest/updated version of this article (list of ebooks) here:
Learn all about Small Basic by using the curriculum. With the curriculum, you can lean Small Basic with separate lessons - just like you would in a classroom. You can download the curriculum, which includes PowerPoint decks to teach from. As a teacher or as a student learning Small Basic on your own, the curriculum will guide you step by step.
.png) | |
.png) | |
.png) |
If you do not have Microsoft Office PowerPoint on your computer, you can view the curriculum by installing the Microsoft PowerPoint Viewer at no cost:
See the latest/updated version of this article (list of curriculum) here:
We've spoken to college students about Small Basic in the past and I've heard Small Basic explained and presented. That led me to realize that we need a short and concise explanation for the existence of Small Basic...
Small Basic exists to help students as young as age eight learn the foundations of computer programming and then graduate to Visual Basic via the free software, Visual Studio Express, where they can continue to build on the foundation by learning Visual C#, VB.NET, and Visual C++.
And here is a more feature-oriented explanation from the Small Basic founder, Vijaye...
Small Basic is a project that is focused at making programming accessible and easy for beginners. It consists of three distinct pieces:
The Language draws its inspiration from an early variant of BASIC but is based on the modern .Net Framework Platform. The Environment is simple but rich in features, offering beginners several of the benefits that professional programmers have come to expect of a worthy IDE. A rich set of Libraries help beginners learn by writing compelling and interesting programs.
Small Basic is intended for beginners that want to learn programming. In our internal trials we've had success with kids between the ages of 10 and 16. However, it's not limited to just kids; even adults that had an inclination to programming have found Small Basic very helpful in taking that first step.
Today's featured program is SB Chomper, a packman clone. It's fantastic! You can play it here:
Chomper (Packman) - by Anthony Yarrell/QBasicLover
Who is Anthony Yarrell (goes by QBasicLover)? Here is his bio in his own words...
![]()
"I (Anthony Yarrell, a.k.a. QBasicLover) am an office support worker in the health insurance industry. I became a hobbyist (amateur) programmer starting with QBasic under MS-DOS 6.22 "back in the day". Now I program primarily in Microsoft Visual Basic 2010, Microsoft Small Basic, and Java. My goal is to create my own versions of the classic games that I grew up with in the 1980s & 90s (Atari games, Commodore 64 games, early Nintendo games, Vectrex, etc), not only for my own pleasure, but also for educational purposes in the Microsoft Small Basic forum."
And here is the import code and the release notes...
These notes are about the final version (he may work out any remaining bugs when he does a version 2 in the summer):
BFN681 (import code)
Known Bugs (that remain to be fixed):
Bug Fixes:
Added the following features:
Thanks to LitDev for nominating Chomper in this forum thread: http://social.msdn.microsoft.com/Forums/en-US/smallbasic/thread/c75994be-5ecd-4f72-83a5-39ce66ebadfb
Enjoy!
- Ninja Ed
The answer comes from the creator of Small Basic, Vijaye Raji...
Small Basic is small - much smaller than VB and supports just a subset of what VB.Net supports. Besides, you can actually write a compiler using VB.Net.
Got any other explanations as to how Small Basic is different from QBASIC and VB.NET? Is there anything else we should compare/contrast it to? Leave a comment with your answers!
Thanks!
- Ninja Ed
Today's guest blogger is Jibba Jabba (Rick Murphy)...
![]()
About Rick Murphy... amateur programmer. Began with Small Basic in Dec 2012. Last job was as a kitchen supervisor for 8 years. Now taking a break. Like cooking, love programming.
Rick wrote this great bit about what programming language you should learn...
===========================================
After doing a bit of reading it seems a lot of teachers at all levels, school to university/college level, have observed that one of the most common questions a student asks is:
"What is the best programming language to learn?"
So far (as a nOOb for 4 months) I've learnt a more useful question to ask would be? "What do I need the language to do?"
Define and clarify your objective then select a language designed for that kind of task. You'll most likely go on to learn several languages suitable for different purposes (paradigms) and each one will become easier to learn as your experience builds. Practice = Experience.
e.g. if you want to code firmware for a new 3d TV or something like that then you might choose a language like C, as it is close to the hardware. But this kind of language requires at lot of skill and prior experience to code in.
So if your objective is to learn how to become a good programmer and you're new to the wonderful world of programming or returning after a considerable break, then it's wise to select a language designed specifically for that task.
Small basic is a high level and considerably powerful language simplified for that purpose. It is simplified and as a result makes the programmer work out ways of doing things that might otherwise be a feature in another language. It provides a good grounding for skills that you'll need to be a good programmer. Totally suitable for all ages.
nOOb Alert: If you don't agree with any of this or think is inaccurate in anyway pls reply. I've only been back into programming for 4 months, but this what I've read and now share.
===========================================
If you'd like to agree/disagree with Rick, please go check out the forum thread on this subject:
http://social.msdn.microsoft.com/Forums/en-US/smallbasic/thread/e22ddc96-a46c-4df6-a066-cef92f47ad30
Thanks!
- Ninja Ed
Originally written by the creator of Small Basic, Vijaye Raji...
Here are the unique features of the Small Basic language:
Just like the early variants of BASIC, Small Basic is imperative and doesn't
use or expose beginners to concepts like scopes, types, object orientation,
etc.
The Small Basic language consists of just 14 keywords.
There actually isn't one. You can create string and numeric constants and
assign them to variables. Operations performed on these variables will be
interpreted according to the content.
All variables are global and are always initialized. They can be used before
they're assigned.
You can create a sub-routine and assign it to an event. This will wire the it
up to an the event.
The libraries provide static "Objects" that group operations, properties and
events. New libraries can be created using other .Net Languages and added to the
Small Basic runtime.
http://www.mainstemacademy.com/
Mark McDonald at Main Stem Academy is teaching Small Basic camps. Each camp is tutorial driven. Kids can join any time or go to the whole series. If they attend the whole series, they will be challenged with new tutorials and scenarios each week. They will use agile project management techniques. Kids will learn how to design, build algorithms, manage a project, and work together in a team environment, building valuable experience for a real-world, professional business environment.
Visit the Small Basic camp page of the Main Stem Academy website for pricing information and to register:
http://www.mainstemacademy.com/small-basic/
Here are the Summer 2013 camps:
For each camp, students can attend the full day or half a day (in the morning or afternoon). See the link above for price differences.


Mark spent 28 years in software development, project and product management, and enterprise software implementations. He is a Certified ScrumMaster and author of technology books. His consulting base included Boeing, Microsoft, JD Edwards Chase, Broderbund, CB Richard Ellis, US Navy, US Forest Service, NBBJ, Swedish Medical Center and many other companies and organizations. He enjoys teaching and seeing young people learn programming, project management and entrepreneurship.
Any questions or requests for Mark?
- Ed
Check out this fantastic 3D real-time game (that runs online)...
3D Color RayCaster Maze - by Old Basic Coder
From the creator, Old Basic Coder...
I made a "3D Maze" type program as an exercise. Had not programmed anything for about 25 years, fancied getting back into it, and downloaded the free version of Visual Studio. It popped up with the option of SmallBasic, so I thought I'd start there first.
My first attempt at the 3D maze has been uploaded to program ID - DWV967
However, I wanted to develop this further into something that resembled the old Bard's Tale games and have some simple textured walls/graphics. But couldn't work out how to transform and project the textures in software alone. I then read about RayCasting being an efficient method of portraying a simple pseudo 3d world made from blocks, with the ability to map simple textures.
Found a tutorial at lodev.org with some sample C++ code. I eventually worked out how to translate this into Smallbasic (have never coded C++ before!!) and managed to get the basic engine working.
After that, I made some improvements to the code (though it is still a bit messy, could probably be optimised and needs more annotation), and included colour shading that gets darker the further away the walls are.
My RayCaster Maze has been uploaded to program ID - RVR504
FIrst Version - BRS931
It's probably not running fast enough to include textures within Small Basic, which would probably benefit from some type of screen buffering (double buffering?) but am now very keen to see if I can port this to my Nexus 7 using "RFO Basic!", include textures and eventually some basic RPG elements too.
I would love to see the RPG elements too, like characters who give you hints in the maze or random enemies that pop up.
I issued the challenge to the community in the Small Basic forum to improve on the maze:
Small Basic Community Challenge: Want to turn this 3D Maze into an RPG?
Great job, Old Basic Coder!
- Ninja Ed
Today's featured TechNet Wiki article comes from LitDev...
Find the latest and complete version of this article here, on TechNet Wiki:
This article covers the basics of text manipulation in Small Basic using the Text object.
Text is a series of characters, often called a string in computing. A string can be a constant (or literal) enclosed within a set of double quotes, or a variable can be assigned to hold a string.
txt = "Hello World"Above, txt is a variable that contains the string literal "Hello World".
As stated, the string contains a set or characters, in the example above there are 11 characters, 'H', 'e', 'l', 'l', 'o', ' ', 'W', 'o', 'r', 'l' and 'd'.
A string can also be a series of numbers such as "3.14159", or even contain special characters like backspace, newline, '♥' or even a system beep. These are not to be confused with the different representations of the characters that different fonts can provide, including different language fonts like the symbol font.
Each character is identified internally by a 'character code' or number, often called ASCII or UNICODE number.
We often want to form one string from others or query a string to see what it contains.
The following is a brief summary of the Small Basic Text object methods with some simple examples.
Returns the number or characters in the input string.
txt = "Hello World"TextWindow.WriteLine(txt+" contains "+Text.GetLength(txt)+" characters")The empty string "" has a special meaning in Small Basic. It represents a variable that has not been set, and in fact an array or one of its elements is deleted by setting it to "". We cannot therefore have an array element that is the empty string "".
Joins or concatenates two strings. We can also use + to join two strings in general. However, if the strings are actually numbers, then + would add them numerically rather than join the strings.
TextWindow.WriteLine("35"+"17")TextWindow.WriteLine(Text.Append("35","17"))This is very straight forward, simply creates a copy of the input string converting the case.
This can be very useful for comparing the equivalence of strings in a case insenstive way. If we convert both to the same case (say lower) and test if they are equal then the case of the original things is effectively ignored.
TextWindow.WriteLine("Enter a name")inputName = TextWindow.Read()If (Text.ConvertToLowerCase(inputName) = "john") Then TextWindow.WriteLine("Hello "+inputName)EndIfCreate a copy of the input string, with all characters converted to lower case.
Create a copy of the input string, with all characters converted to upper (or capital) case.
========================
You can read the rest of the article on TechNet Wiki:
Thanks to LitDev for this fantastic contribution!
- Ninja Ed
I'm naming this after the creator, NaochanON.
Play the game here:
It's a version of Pong, where you play against the computer, and then there's a barrier in the middle that's moving. Plus add the gameplay mechanic of the ball steadily speeding up and you have an addictive and challenging game!
From NaochanOn:
"My blog is "tajiriarabay.blogspot.com". (Written in Japanese. but you can understand program code. XD)"
From Jibba Jabba:
The program runs well - very smooth and playable.
Also liked how it was written, easy to read and learn from.
Thanks to Jibba Jabba for nominating the game here: http://social.msdn.microsoft.com/Forums/en-US/smallbasic/thread/c75994be-5ecd-4f72-83a5-39ce66ebadfb
- Ninja Ed
The Small Basic compiler and the environment allow 3rd party Small Basic libraries to be plugged in to extend the possibilities of what you can do from within Small Basic.
Here is a list of the Small Basic Extensions:
Small Basic Extensions Gallery
Would you like to learn how to create an extension for Small Basic?
Small Basic: How to Create an Extension Using C# - by Liam McSherry
Small Basic: How to Create an Extension Using VB.NET - by Noah Buscher
Have you used or created extensions for Small Basic? Are they listed on the Extensions Gallery (link above)?
Thanks!
- Ninja Ed
Last time, we discussed Does Small Basic support Extensions?
Well here's an example!
Check out this new extension:
Barcode Extension - by NaochanOn
From NaochanOn:
I made an extension to make QRCode or Barcode.
Converting engine is DotNetBarcode.dll. (this is free ware)
Programs are here. Use freely, and enjoy.
Enjoy!
- Ninja Ed
TechNet Wiki is looking for and celebrating the best of the best!
Is that you? Do you consider yourself an expert or authority on Small Basic?
Show us your forum solutions and become MICROSOFT TECHNOLOGY GURU OF THE MONTH!
This is an official Microsoft TechNet recognition program, where people such as yourselves can get the recognition you deserve, for the time you've given the community.
If you spend any amount of time crafting an awesome answer to a forum question, then why not get the most back for your efforts, by posting it to TechNet Wiki.
1) Please copy over any solutions you post here to TechNet Wiki.
2) Add a link to it on THE JUNE TECHNET GURU WIKI PAGE, so we know you've contributed
3) Every month, we will highlight your contributions, and select a "Guru of the Month" in each technology.
This is a new initiative, currently only rewarding "textually" in the TechNet blogs, similar to Peter Laker's weekly contributor awards. Once you're "on our radar" and making your mark, you will probably
be interviewed for your greatness, and eventually even invited into other TechNet/MSDN circles!
Either way, winning this award in your favored technology can only be good for your career! ;)
All you need to do is find any forum question you have ever answered in this forum (either with a blog post or in the forum thread). Then turn it into a Wiki article in June 2013, and add it to the list on the June TechNet Guru Wiki page! For the May contributions, see TechNet Guru Contributions - May.
For more information on the benefits, recognition points, and glory of posting to TechNet Wiki, please read this sticky note.
Feel free to ask any questions in the comments below or in this Small Basic forum thread.
Thanks in advance!
- Ninja Ed
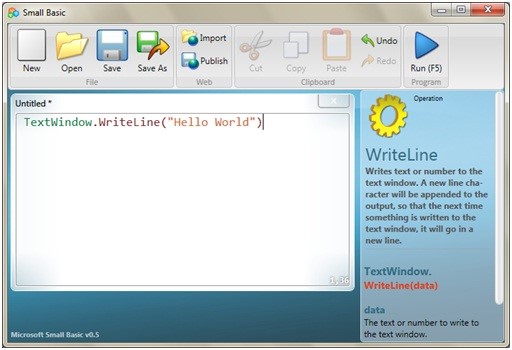
Mirosoft Small Basic puts the "fun" back into computer programming. With a friendly development environment that is very easy to master, it eases both kids and adults into the world of programming.

Small Basic combines a friendly environment with a very simple language and a rich and engaging set of libraries to make your programs and games pop. In a matter of few lines of code, you will be well on your way to creating your very own game!
With a new and revolutionary IntelliSense®, Small Basic makes writing code a breeze.

Share your programs with your friends; let them import your published programs and run them on their computer. Using the Silverlight player, you can even post your games on your blogs and websites for them to play your creations in the browser.
Learn the programming concepts starting with the fundamentals and move your way up. Small Basic is based on .NET and what you learn here could be easily applied to other .NET programming languages like Visual Basic. And when you do graduate to Visual Basic, you can bring your existing programs with you using a built-in conversion utility.
Thanks to Vijaye Raji for the content!
Don't forget to check out the Small Basic forum:
Thanks!
- Ninja Ed

It was a beautiful sunny weekend, and wife's mandate of father-son bonding was to be obeyed... So, after a bike ride, it's time for some coding. Small Basic, that is.
My little boy has been bugging me about game programming. After some convincing, he settled on Pong, not entirely sure what Pong is.
Having in mind to post the process to the blog, we saved multiple versions of the code, so to show the progress. I think he is still too young to understand version control :)
Version 1:
' make background
GraphicsWindow.Width = "700"
GraphicsWindow.Height = "500"
'set pen
GraphicsWindow.PenColor = "gray"
GraphicsWindow.PenWidth = "50"
'draw border
GraphicsWindow.DrawRectangle(0,0,700,500)
' set brush
GraphicsWindow.BrushColor = "white"
' make goals, size 100, from (0,200) to (0,300)
GraphicsWindow.FillRectangle(0,200,26,100)
GraphicsWindow.FillRectangle(674,200,26,100)
' set brush
GraphicsWindow.BrushColor = "black"
'make ball
GraphicsWindow.FillEllipse(345,245,10,10)
'make paddles
GraphicsWindow.FillRectangle(30,220,10,60)
GraphicsWindow.FillRectangle(664,220,10,60)
He did most of the work himself for V1.
It's pretty straightforward. The only question I had for him was why 700x500 for the graphic window. Personally, I'd go with 800x600, or1024x768. You know the whole VGA/SVGA thing :)
His reply was that he always use 700x500 for the graphics window.
One thing worth noting is that BrushColor and PenColor are for difference purposes. The former for filling an object, the latter for drawing an object.
Version 2:
In V2, we added the wall for bouncing from left to right (X coordinates). I gave him the idea that the illusion of a ball moving is achieved by repeatedly drawing and erasing a ball in a new position.
The speed of the ball movement can be adjusted by two factors:
Timer.interval and step size in moving in X direction.
The part of making the ball bounced off the wall seemed like a magic. In reality it is nothing but flipping the corresponding step size (StepX) to the negative.
In fact, I made him to pretend to be a ball, and count out loud the steps, walk towards the wall, and "bouncing" off the wall. After a couple times, he got it :)
' v2
' bounces well, left to right
' make background
GraphicsWindow.Width = "700"
GraphicsWindow.Height = "500"
'set pen
GraphicsWindow.PenColor = "gray"
GraphicsWindow.PenWidth = "50"
'draw border
GraphicsWindow.DrawRectangle(0,0,700,500)
' set brush
GraphicsWindow.BrushColor = "white"
' make left goal, size 100, from (0,200) to (0,300)
GraphicsWindow.FillRectangle(0,200,26,100)
' make right goal, size 100, from (674,200) to (674,300)
GraphicsWindow.FillRectangle(674,200,26,100)
' set brush
GraphicsWindow.BrushColor = "black"
' make paddles
GraphicsWindow.FillRectangle(30,220,10,60)
GraphicsWindow.FillRectangle(664,220,10,60)
' draw ball
Sub DrawBall
GraphicsWindow.BrushColor = "black"
GraphicsWindow.FillEllipse(BallX,BallY,10,10)
EndSub
' erase ball
Sub EraseBall
GraphicsWindow.PenWidth = "2"
GraphicsWindow.BrushColor = "white"
GraphicsWindow.FillEllipse(BallX,BallY,10,10)
GraphicsWindow.PenColor = "white"
GraphicsWindow.DrawEllipse(BallX,BallY,10,10)
EndSub
' sleep
Timer.Interval = 1
Timer.Tick = RunGame
StepSize = 2
StepX = StepSize
StepY = 0
BallX=345
' BallY=245
BallY=100
LeftWallX = 27
RightWallX = 660
DrawBall()
Sub RunGame
EraseBall()
BallX = BallX + StepX
BallY = BallY + StepY
' Hit right wall
If BallX >= RightWallX Then
StepX = -StepSize
EndIf
' Hit left wall
If BallX <= LeftWallX Then
StepX = StepSize
EndIf
DrawBall()
EndSub
Version 3:
In V3, we handled bouncing the wall up and down. This mirrors what's done in V2, except using StepX as opposed to StepY. When put together, the ball can now bounces off all 4 walls (disregarding the goals and paddles). It almost seemed magical.
' v3
' bounces well, left to right, and up and down.
' make background
GraphicsWindow.Width = "700"
GraphicsWindow.Height = "500"
'set pen
GraphicsWindow.PenColor = "gray"
GraphicsWindow.PenWidth = "50"
'draw border
GraphicsWindow.DrawRectangle(0,0,700,500)
' set brush
GraphicsWindow.BrushColor = "white"
' make left goal, size 100, from (0,200) to (0,300)
GraphicsWindow.FillRectangle(0,200,26,100)
' make right goal, size 100, from (674,200) to (674,300)
GraphicsWindow.FillRectangle(674,200,26,100)
' set brush
GraphicsWindow.BrushColor = "black"
' make paddles
GraphicsWindow.FillRectangle(30,220,10,60)
GraphicsWindow.FillRectangle(664,220,10,60)
' draw ball
Sub DrawBall
GraphicsWindow.BrushColor = "black"
GraphicsWindow.FillEllipse(BallX,BallY,10,10)
EndSub
' erase ball
Sub EraseBall
GraphicsWindow.PenWidth = "2"
GraphicsWindow.BrushColor = "white"
GraphicsWindow.FillEllipse(BallX,BallY,10,10)
GraphicsWindow.PenColor = "white"
GraphicsWindow.DrawEllipse(BallX,BallY,10,10)
EndSub
' sleep
Timer.Interval = 1
Timer.Tick = RunGame
StepSizeX = 2
StepSizeY = 2
StepX = StepSizeX
StepY = StepSizeY
BallX=345
' BallY=245
BallY=100
' Edges of the 4 walls
LeftWallX = 27
RightWallX = 660
TopWallY = 27
BottomWallY = 460
DrawBall()
Sub RunGame
EraseBall()
' Calculate the new position for ball
BallX = BallX + StepX
BallY = BallY + StepY
' Hit right wall
If BallX >= RightWallX Then
StepX = -StepSizeX
EndIf
' Hit left wall
If BallX <= LeftWallX Then
StepX = StepSizeX
EndIf
' Hit bottom wall
If BallY >= BottomWallY Then
StepY = -StepSizeY
EndIf
' Hit top wall
If BallY <= TopWallY Then
StepY = StepSizeY
EndIf
DrawBall()
EndSub
Version 4:
In V4, we took care of bouncing the ball of paddles.
' v3 - bounces well, left to right, and up and down.
' v4 - bounces off paddles
' make background
GraphicsWindow.Width = "700"
GraphicsWindow.Height = "500"
'set pen
GraphicsWindow.PenColor = "gray"
GraphicsWindow.PenWidth = "50"
'draw border
GraphicsWindow.DrawRectangle(0,0,700,500)
' set brush
GraphicsWindow.BrushColor = "white"
' make left goal, size 100, from (0,200) to (0,300)
GraphicsWindow.FillRectangle(0,200,26,100)
' make right goal, size 100, from (674,200) to (674,300)
GraphicsWindow.FillRectangle(674,200,26,100)
' set brush
GraphicsWindow.BrushColor = "black"
' make paddles
'GraphicsWindow.FillRectangle(30,220,10,60)
'GraphicsWindow.FillRectangle(664,220,10,60)
LeftPaddleX = 30
LeftPaddleY = 220
RightPaddleX = 664
RightPaddleY = 220
' draw left paddle
Sub DrawLeftPaddle
GraphicsWindow.BrushColor = "black"
GraphicsWindow.FillRectangle(LeftPaddleX,LeftPaddleY,10,60)
EndSub
' erase left paddle
Sub EraseLeftPaddle
GraphicsWindow.BrushColor = "white"
GraphicsWindow.FillRectangle(LeftPaddleX,LeftPaddleY,10,60)
EndSub
' draw right paddle
Sub DrawRightPaddle
GraphicsWindow.BrushColor = "black"
GraphicsWindow.FillRectangle(RightPaddleX,RightPaddleY,10,60)
EndSub
' erase right paddle
Sub EraseRightPaddle
GraphicsWindow.BrushColor = "white"
GraphicsWindow.FillRectangle(RightPaddleX,RightPaddleY,10,60)
EndSub
' draw ball
Sub DrawBall
GraphicsWindow.BrushColor = "black"
GraphicsWindow.FillEllipse(BallX,BallY,10,10)
EndSub
' erase ball
Sub EraseBall
GraphicsWindow.PenWidth = "2"
GraphicsWindow.BrushColor = "white"
GraphicsWindow.FillEllipse(BallX,BallY,10,10)
GraphicsWindow.PenColor = "white"
GraphicsWindow.DrawEllipse(BallX,BallY,10,10)
EndSub
'' hooking up events
Timer.Interval = 1
Timer.Tick = RunGame
StepSizeX = 2
StepSizeY = 2
StepX = StepSizeX
StepY = StepSizeY
BallX=345
' BallY=245
BallY=245
' Edges of the 4 walls
LeftWallX = 27
RightWallX = 660
TopWallY = 27
BottomWallY = 460
DrawBall()
DrawLeftPaddle()
DrawRightPaddle()
Sub RunGame
EraseBall()
' Calculate the new position for ball
BallX = BallX + StepX
BallY = BallY + StepY
' Hit right wall
If BallX >= RightWallX Then
StepX = -StepSizeX
EndIf
' Hit left wall
If BallX <= LeftWallX Then
StepX = StepSizeX
EndIf
' Hit bottom wall
If BallY >= BottomWallY Then
StepY = -StepSizeY
EndIf
' Hit top wall
If BallY <= TopWallY Then
StepY = StepSizeY
EndIf
' Hit right paddle
If (BallX >= RightPaddleX-12) And (BallY >= RightPaddleY) And (BallY <= RightPaddleY+60) Then
StepX = -StepSizeX
DrawRightPaddle()
EndIf
' Hit left paddle
If (BallX <= LeftPaddleX+12) And (BallY >= LeftPaddleY) And (BallY <= LeftPaddleY+60) Then
StepX = StepSizeX
DrawLeftPaddle()
EndIf
DrawBall()
EndSub
Version 5:
In V5, we made the paddles movable.
The trick here is to add the events to handle key. First we used KeyDown event.
For reasons I don't understand, the little fellow insisted that the left player should use "W" for up and "S" for down, while the right user uses Up Arrow for up, and Down Arrow for down.
During testing, I had this line added to event handler:
GraphicsWindow.Title = "'" + LastKey + "' pressed"
That way, it's easier to tell which key was pressed (or released rather), and what's the corresponding value should be used in the code.
' v3 - bounces well, left to right, and up and down.
' v4 - bounces off paddles
' v5 - paddles can move
' make background
GraphicsWindow.Width = "700"
GraphicsWindow.Height = "500"
'set pen
GraphicsWindow.PenColor = "gray"
GraphicsWindow.PenWidth = "50"
'draw border
GraphicsWindow.DrawRectangle(0,0,700,500)
' set brush
GraphicsWindow.BrushColor = "white"
' make left goal, size 100, from (0,200) to (0,300)
GraphicsWindow.FillRectangle(0,200,26,100)
' make right goal, size 100, from (674,200) to (674,300)
GraphicsWindow.FillRectangle(674,200,26,100)
' set brush
GraphicsWindow.BrushColor = "black"
' make paddles
'GraphicsWindow.FillRectangle(30,220,10,60)
'GraphicsWindow.FillRectangle(664,220,10,60)
LeftPaddleX = 30
LeftPaddleY = 220
RightPaddleX = 664
RightPaddleY = 220
' draw left paddle
Sub DrawLeftPaddle
GraphicsWindow.BrushColor = "black"
GraphicsWindow.FillRectangle(LeftPaddleX,LeftPaddleY,10,60)
EndSub
' erase left paddle
Sub EraseLeftPaddle
GraphicsWindow.BrushColor = "white"
GraphicsWindow.FillRectangle(LeftPaddleX,LeftPaddleY,10,60)
EndSub
' draw right paddle
Sub DrawRightPaddle
GraphicsWindow.BrushColor = "black"
GraphicsWindow.FillRectangle(RightPaddleX,RightPaddleY,10,60)
EndSub
' erase right paddle
Sub EraseRightPaddle
GraphicsWindow.BrushColor = "white"
GraphicsWindow.FillRectangle(RightPaddleX,RightPaddleY,10,60)
EndSub
' draw ball
Sub DrawBall
GraphicsWindow.BrushColor = "black"
GraphicsWindow.FillEllipse(BallX,BallY,10,10)
EndSub
' erase ball
Sub EraseBall
GraphicsWindow.PenWidth = "2"
GraphicsWindow.BrushColor = "white"
GraphicsWindow.FillEllipse(BallX,BallY,10,10)
GraphicsWindow.PenColor = "white"
GraphicsWindow.DrawEllipse(BallX,BallY,10,10)
EndSub
'' hooking up events
Timer.Interval = 1
Timer.Tick = RunGame
GraphicsWindow.KeyDown = OnKeyDown
' handle key press, move paddles
Sub OnKeyDown
LastKey = GraphicsWindow.LastKey
GraphicsWindow.Title = "'" + LastKey + "' pressed"
If (LastKey = "W") And (LeftPaddleY >= 31) Then
EraseLeftPaddle()
LeftPaddleY = LeftPaddleY - 10
DrawLeftPaddle()
ElseIf (LastKey = "S") And (LeftPaddleY <= 400) Then
EraseLeftPaddle()
LeftPaddleY = LeftPaddleY + 10
DrawLeftPaddle()
EndIf
If (LastKey = "I") And (RightPaddleY >= 31) Then
EraseRightPaddle()
RightPaddleY = RightPaddleY - 10
DrawRightPaddle()
ElseIf (LastKey = "K") And (RightPaddleY <= 400) Then
EraseRightPaddle()
RightPaddleY = RightPaddleY + 10
DrawRightPaddle()
EndIf
EndSub
StepSizeX = 2
StepSizeY = 2
StepX = StepSizeX
StepY = StepSizeY
BallX=345
' BallY=245
BallY=245
' Edges of the 4 walls
LeftWallX = 27
RightWallX = 660
TopWallY = 27
BottomWallY = 460
DrawBall()
DrawLeftPaddle()
DrawRightPaddle()
Sub RunGame
EraseBall()
' Calculate the new position for ball
BallX = BallX + StepX
BallY = BallY + StepY
' Hit right wall
If BallX >= RightWallX Then
StepX = -StepSizeX
EndIf
' Hit left wall
If BallX <= LeftWallX Then
StepX = StepSizeX
EndIf
' Hit bottom wall
If BallY >= BottomWallY Then
StepY = -StepSizeY
EndIf
' Hit top wall
If BallY <= TopWallY Then
StepY = StepSizeY
EndIf
' Hit right paddle
If (BallX >= RightPaddleX-12) And (BallY >= RightPaddleY) And (BallY <= RightPaddleY+60) Then
StepX = -StepSizeX
DrawRightPaddle()
EndIf
' Hit left paddle
If (BallX <= LeftPaddleX+12) And (BallY >= LeftPaddleY) And (BallY <= LeftPaddleY+60) Then
StepX = StepSizeX
DrawLeftPaddle()
EndIf
DrawBall()
EndSub
Version 6:
In V6, we solved the two-player problem.
We found it to be problematic, when both players try to hold the key down at the same time. The program can only respond to one.
I had the idea of instead to handle KeyUp event. That way it will force players to hit the keys instead of holding the keys down and don't let it go.
' v3 - bounces well, left to right, and up and down.
' v4 - bounces off paddles
'v5 - paddles can move
'v6 - change from KeyDown to KeyUp for two-player mode
' make background
GraphicsWindow.Width = "700"
GraphicsWindow.Height = "500"
'set pen
GraphicsWindow.PenColor = "gray"
GraphicsWindow.PenWidth = "50"
'draw border
GraphicsWindow.DrawRectangle(0,0,700,500)
' set brush
GraphicsWindow.BrushColor = "white"
' make left goal, size 100, from (0,200) to (0,300)
GraphicsWindow.FillRectangle(0,200,26,100)
' make right goal, size 100, from (674,200) to (674,300)
GraphicsWindow.FillRectangle(674,200,26,100)
' set brush
GraphicsWindow.BrushColor = "black"
' make paddles
'GraphicsWindow.FillRectangle(30,220,10,60)
'GraphicsWindow.FillRectangle(664,220,10,60)
LeftPaddleX = 30
LeftPaddleY = 220
RightPaddleX = 664
RightPaddleY = 220
' draw left paddle
Sub DrawLeftPaddle
GraphicsWindow.BrushColor = "black"
GraphicsWindow.FillRectangle(LeftPaddleX,LeftPaddleY,10,60)
EndSub
' erase left paddle
Sub EraseLeftPaddle
GraphicsWindow.BrushColor = "white"
GraphicsWindow.FillRectangle(LeftPaddleX,LeftPaddleY,10,60)
EndSub
' draw right paddle
Sub DrawRightPaddle
GraphicsWindow.BrushColor = "black"
GraphicsWindow.FillRectangle(RightPaddleX,RightPaddleY,10,60)
EndSub
' erase right paddle
Sub EraseRightPaddle
GraphicsWindow.BrushColor = "white"
GraphicsWindow.FillRectangle(RightPaddleX,RightPaddleY,10,60)
EndSub
' draw ball
Sub DrawBall
GraphicsWindow.BrushColor = "black"
GraphicsWindow.FillEllipse(BallX,BallY,10,10)
EndSub
' erase ball
Sub EraseBall
GraphicsWindow.PenWidth = "2"
GraphicsWindow.BrushColor = "white"
GraphicsWindow.FillEllipse(BallX,BallY,10,10)
GraphicsWindow.PenColor = "white"
GraphicsWindow.DrawEllipse(BallX,BallY,10,10)
EndSub
'' hooking up events
Timer.Interval = 1
Timer.Tick = RunGame
GraphicsWindow.KeyUp = OnKeyUp
' handle key press, move paddles
Sub OnKeyUp
LastKey = GraphicsWindow.LastKey
GraphicsWindow.Title = "'" + LastKey + "' pressed"
If (LastKey = "W") And (LeftPaddleY >= 31) Then
EraseLeftPaddle()
LeftPaddleY = LeftPaddleY - 10
DrawLeftPaddle()
ElseIf (LastKey = "S") And (LeftPaddleY <= 400) Then
EraseLeftPaddle()
LeftPaddleY = LeftPaddleY + 10
DrawLeftPaddle()
EndIf
If (LastKey = "Up") And (RightPaddleY >= 31) Then
EraseRightPaddle()
RightPaddleY = RightPaddleY - 10
DrawRightPaddle()
ElseIf (LastKey = "Down") And (RightPaddleY <= 400) Then
EraseRightPaddle()
RightPaddleY = RightPaddleY + 10
DrawRightPaddle()
EndIf
EndSub
StepSizeX = 2
StepSizeY = 2
StepX = StepSizeX
StepY = StepSizeY
BallX=345
' BallY=245
BallY=245
' Edges of the 4 walls
LeftWallX = 27
RightWallX = 660
TopWallY = 27
BottomWallY = 460
DrawBall()
DrawLeftPaddle()
DrawRightPaddle()
Sub RunGame
EraseBall()
' Calculate the new position for ball
BallX = BallX + StepX
BallY = BallY + StepY
' Hit right wall
If BallX >= RightWallX Then
StepX = -StepSizeX
EndIf
' Hit left wall
If BallX <= LeftWallX Then
StepX = StepSizeX
EndIf
' Hit bottom wall
If BallY >= BottomWallY Then
StepY = -StepSizeY
EndIf
' Hit top wall
If BallY <= TopWallY Then
StepY = StepSizeY
EndIf
' Hit right paddle
If (BallX >= RightPaddleX-12) And (BallY >= RightPaddleY) And (BallY <= RightPaddleY+60) Then
StepX = -StepSizeX
DrawRightPaddle()
EndIf
' Hit left paddle
If (BallX <= LeftPaddleX+12) And (BallY >= LeftPaddleY) And (BallY <= LeftPaddleY+60) Then
StepX = StepSizeX
DrawLeftPaddle()
EndIf
DrawBall()
EndSub
Version 7:
Finally, in V7, we added additional code to count scores and see who is the winner.
' v3 - bounces well, left to right, and up and down.
' v4 - bounces off paddles
' v5 - paddles can move
' v6 - change from KeyDown to KeyUp for two-player mode
' v7 - count scores
' make background
GraphicsWindow.Width = "700"
GraphicsWindow.Height = "500"
'set pen
GraphicsWindow.PenColor = "gray"
GraphicsWindow.PenWidth = "50"
'draw border
GraphicsWindow.DrawRectangle(0,0,700,500)
' set brush
GraphicsWindow.BrushColor = "white"
' make left goal, size 100, from (0,200) to (0,300)
GraphicsWindow.FillRectangle(0,200,26,100)
' make right goal, size 100, from (674,200) to (674,300)
GraphicsWindow.FillRectangle(674,200,26,100)
' set brush
GraphicsWindow.BrushColor = "black"
' make paddles
'GraphicsWindow.FillRectangle(30,220,10,60)
'GraphicsWindow.FillRectangle(664,220,10,60)
LeftPaddleX = 30
LeftPaddleY = 220
RightPaddleX = 664
RightPaddleY = 220
' draw left paddle
Sub DrawLeftPaddle
GraphicsWindow.BrushColor = "black"
GraphicsWindow.FillRectangle(LeftPaddleX,LeftPaddleY,10,60)
EndSub
' erase left paddle
Sub EraseLeftPaddle
GraphicsWindow.BrushColor = "white"
GraphicsWindow.FillRectangle(LeftPaddleX,LeftPaddleY,10,60)
EndSub
' draw right paddle
Sub DrawRightPaddle
GraphicsWindow.BrushColor = "black"
GraphicsWindow.FillRectangle(RightPaddleX,RightPaddleY,10,60)
EndSub
' erase right paddle
Sub EraseRightPaddle
GraphicsWindow.BrushColor = "white"
GraphicsWindow.FillRectangle(RightPaddleX,RightPaddleY,10,60)
EndSub
' draw ball
Sub DrawBall
GraphicsWindow.BrushColor = "black"
GraphicsWindow.FillEllipse(BallX,BallY,10,10)
EndSub
' erase ball
Sub EraseBall
GraphicsWindow.PenWidth = "2"
GraphicsWindow.BrushColor = "white"
GraphicsWindow.FillEllipse(BallX,BallY,10,10)
GraphicsWindow.PenColor = "white"
GraphicsWindow.DrawEllipse(BallX,BallY,10,10)
EndSub
'' hooking up events
Timer.Interval = 1
Timer.Tick = RunGame
GraphicsWindow.KeyUp = OnKeyUp
' handle key press, move paddles
Sub OnKeyUp
LastKey = GraphicsWindow.LastKey
' GraphicsWindow.Title = "'" + LastKey + "' pressed"
If (LastKey = "W") And (LeftPaddleY >= 31) Then
EraseLeftPaddle()
LeftPaddleY = LeftPaddleY - 10
DrawLeftPaddle()
ElseIf (LastKey = "S") And (LeftPaddleY <= 400) Then
EraseLeftPaddle()
LeftPaddleY = LeftPaddleY + 10
DrawLeftPaddle()
EndIf
If (LastKey = "Up") And (RightPaddleY >= 31) Then
EraseRightPaddle()
RightPaddleY = RightPaddleY - 10
DrawRightPaddle()
ElseIf (LastKey = "Down") And (RightPaddleY <= 400) Then
EraseRightPaddle()
RightPaddleY = RightPaddleY + 10
DrawRightPaddle()
EndIf
EndSub
StepSizeX = 2
StepSizeY = 2
StepX = StepSizeX
StepY = StepSizeY
' initial ball position
Sub SetBallToMiddle
BallX=345
BallY=245
EndSub
' Edges of the 4 walls
LeftWallX = 27
RightWallX = 660
TopWallY = 27
BottomWallY = 460
SetBallToMiddle()
DrawBall()
DrawLeftPaddle()
DrawRightPaddle()
GraphicsWindow.Title = "Pong"
' begin scores
leftscore = Controls.AddTextBox(5,1)
rightscore = Controls.AddTextBox(531,1)
mesgboard = Controls.AddTextBox(265,1)
leftscorecount = 0
rightscorecount = 0
Controls.SetTextBoxText(leftscore, leftscorecount)
Controls.SetTextBoxText(rightscore, rightscorecount)
Sub RunGame
EraseBall()
' Calculate the new position for ball
BallX = BallX + StepX
BallY = BallY + StepY
' Hit right wall
If BallX >= RightWallX Then
StepX = -StepSizeX
EndIf
' Hit left wall
If BallX <= LeftWallX Then
StepX = StepSizeX
EndIf
' Hit bottom wall
If BallY >= BottomWallY Then
StepY = -StepSizeY
EndIf
' Hit top wall
If BallY <= TopWallY Then
StepY = StepSizeY
EndIf
' Hit right paddle
If (BallX >= RightPaddleX-12) And (BallY >= RightPaddleY) And (BallY <= RightPaddleY+60) Then
StepX = -StepSizeX
DrawRightPaddle()
EndIf
' Hit left paddle
If (BallX <= LeftPaddleX+12) And (BallY >= LeftPaddleY) And (BallY <= LeftPaddleY+60) Then
StepX = StepSizeX
DrawLeftPaddle()
EndIf
' Hit right goal
If (BallX >= RightWallX) And (BallY > 200) And (BallY < 300) Then
SetBallToMiddle()
DrawBall()
GraphicsWindow.Title = "Left player scored"
leftscorecount = leftscorecount + 1
Controls.SetTextBoxText(leftscore, leftscorecount)
EndIf
' Hit left goal
If (BallX <= LeftWallX) And (BallY > 200) And (BallY < 300) Then
SetBallToMiddle()
DrawBall()
GraphicsWindow.Title = "Right player scored"
rightscorecount = rightscorecount + 1
Controls.SetTextBoxText(rightscore, rightscorecount)
EndIf
DrawBall()
' check who won
If leftscorecount >= 3 Then
Controls.SetTextBoxText(mesgboard, "Left side WON!!!")
TheEnd()
EndIf
If rightscorecount >= 3 Then
Controls.SetTextBoxText(mesgboard, "Right side WON!!!")
TheEnd()
EndIf
EndSub
' End the game
Sub TheEnd
SetBallToMiddle()
StepSizeX = 0
StepSizeY = 0
EndSub
We did all this in about 2 hours, on and off. You know kids attention span is short :)
But the way we did it so that at each iteration something is accomplished was very helpful. I guess you could call that Agile development, another concept I will withhold from him for now :)
We hit a bit of unnecessary complications that I should have thought of to avoid. That is, the width of all objects, including the border, the paddles, and balls.
So, a couple times we will have to erase more than what's drawn. Also, the rendering of animation is not as smooth as we would like. The little one is actually not too surprised. He calls them glitches. Guess got used to from video games.
Overall, it was a good experience for a lazy Sunday afternoon. Priceless :)


